Table Of Contents
Previous topic
< Tutorial 2: Introducing INVO
Next topic
This Page
Tutorial 3: Securing INVO
In this chapter, we continue explaining how INVO is structured, we’ll talk about the implementation of authentication, authorization using events and plugins and an access control list (ACL) managed by Phalcon.
Log into the Application
A “log in” facility will allow us to work on backend controllers. The separation between backend controllers and frontend ones is only logical. All controllers are located in the same directory (app/controllers/).
To enter the system, users must have a valid username and password. Users are stored in the table “users” in the database “invo”.
Before we can start a session, we need to configure the connection to the database in the application. A service called “db” is set up in the service container with the connection information. As with the autoloader, we are again taking parameters from the configuration file in order to configure a service:
<?php

use Phalcon\Db\Adapter\Pdo\Mysql as DbAdapter;

// ...

// Database connection is created based on parameters defined in the configuration file
$di->set('db', function() use ($config) {
    return new DbAdapter(array(
        "host"     => $config->database->host,
        "username" => $config->database->username,
        "password" => $config->database->password,
        "dbname"   => $config->database->name
    ));
});
Here, we return an instance of the MySQL connection adapter. If needed, you could do extra actions such as adding a logger, a profiler or change the adapter, setting it up as you want.
The following simple form (app/views/session/index.volt) requests the login information. We’ve removed some HTML code to make the example more concise:
{{ form('session/start') }}
    <fieldset>
        <div>
            <label for="email">Username/Email</label>
            <div>
                {{ text_field('email') }}
            </div>
        </div>
        <div>
            <label for="password">Password</label>
            <div>
                {{ password_field('password') }}
            </div>
        </div>
        <div>
            {{ submit_button('Login') }}
        </div>
    </fieldset>
</form>
Instead of using raw PHP as the previous tutorial, we started to use Volt. This is a built-in template engine inspired in Jinja providing a simpler and friendly syntax to create templates. It will not take too long before you become familiar with Volt.
The SessionController::startAction function (app/controllers/SessionController.php) has the task of validating the data entered in the form including checking for a valid user in the database:
<?php

class SessionController extends ControllerBase
{

    // ...

    private function _registerSession($user)
    {
        $this->session->set('auth', array(
            'id'    => $user->id,
            'name'  => $user->name
        ));
    }

    /**
     * This action authenticate and logs an user into the application
     *
     */
    public function startAction()
    {
        if ($this->request->isPost()) {

            $email      = $this->request->getPost('email');
            $password   = $this->request->getPost('password');

            $user = Users::findFirst(array(
                "(email = :email: OR username = :email:) AND password = :password: AND active = 'Y'",
                'bind' => array('email' => $email, 'password' => sha1($password))
            ));
            if ($user != false) {
                $this->_registerSession($user);
                $this->flash->success('Welcome ' . $user->name);
                return $this->forward('invoices/index');
            }

            $this->flash->error('Wrong email/password');
        }

        return $this->forward('session/index');
    }
}
For the sake of simplicity, we have used “sha1” to store the password hashes in the database, however, this algorithm is not recommended in real applications, use “bcrypt” instead.
Note that multiple public attributes are accessed in the controller like: $this->flash, $this->request or $this->session. These are services defined in the services container from earlier (app/config/services.php). When they’re accessed the first time, they are injected as part of the controller.
These services are “shared”, which means that we are always accessing the same instance regardless of the place where we invoke them.
For instance, here we invoke the “session” service and then we store the user identity in the variable “auth”:
<?php

$this->session->set('auth', array(
    'id'    => $user->id,
    'name'  => $user->name
));
Another important aspect of this section is how the user is validated as a valid one, first we validate whether the request has been made using method POST:
<?php

if ($this->request->isPost()) {
Then, we receive the parameters from the form:
<?php

$email = $this->request->getPost('email');
$password = $this->request->getPost('password');
Now, we have to check if there is one user with the same username or email and password:
<?php

$user = Users::findFirst(array(
    "(email = :email: OR username = :email:) AND password = :password: AND active = 'Y'",
    'bind' => array('email' => $email, 'password' => sha1($password))
));
Note, the use of ‘bound parameters’, placeholders :email: and :password: are placed where values should be, then the values are ‘bound’ using the parameter ‘bind’. This safely replaces the values for those columns without having the risk of a SQL injection.
If the user is valid we register it in session and forwards him/her to the dashboard:
<?php

if ($user != false) {
    $this->_registerSession($user);
    $this->flash->success('Welcome ' . $user->name);
    return $this->forward('invoices/index');
}
If the user does not exist we forward the user back again to action where the form is displayed:
<?php

return $this->forward('session/index');
Securing the Backend
The backend is a private area where only registered users have access. Therefore, it is necessary to check that only registered users have access to these controllers. If you aren’t logged into the application and you try to access, for example, the products controller (which is private) you will see a screen like this:
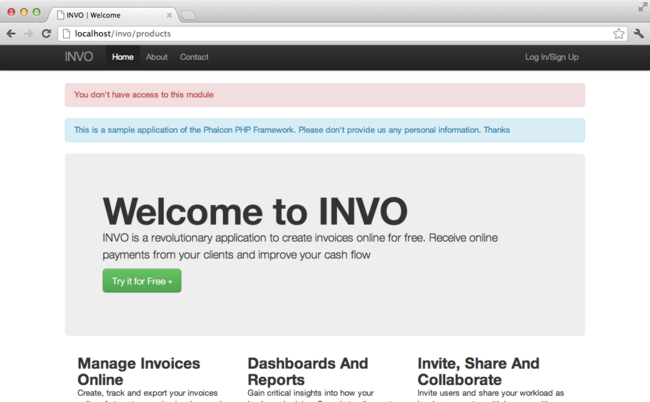
Every time someone attempts to access any controller/action, the application verifies that the current role (in session) has access to it, otherwise it displays a message like the above and forwards the flow to the home page.
Now let’s find out how the application accomplishes this. The first thing to know is that there is a component called Dispatcher. It is informed about the route found by the Routing component. Then, it is responsible for loading the appropriate controller and execute the corresponding action method.
Normally, the framework creates the Dispatcher automatically. In our case, we want to perform a verification before executing the required action, checking if the user has access to it or not. To achieve this, we have replaced the component by creating a function in the bootstrap:
<?php

use Phalcon\Mvc\Dispatcher;

// ...

/**
 * MVC dispatcher
 */
$di->set('dispatcher', function() {

    // ...

    $dispatcher = new Dispatcher;

    return $dispatcher;
});
We now have total control over the Dispatcher used in the application. Many components in the framework trigger events that allow us to modify their internal flow of operation. As the Dependency Injector component acts as glue for components, a new component called EventsManager allows us to intercept the events produced by a component, routing the events to listeners.
Events Management
An EventsManager allows us to attach listeners to a particular type of event. The type that interests us now is “dispatch”. The following code filters all events produced by the Dispatcher:
<?php

use Phalcon\Mvc\Dispatcher;
use Phalcon\Events\Manager as EventsManager;

$di->set('dispatcher', function() {

    $eventsManager = new EventsManager;

    /**
     * Check if the user is allowed to access certain action using the SecurityPlugin
     */
    $eventsManager->attach('dispatch:beforeDispatch', new SecurityPlugin);

    /**
     * Handle exceptions and not-found exceptions using NotFoundPlugin
     */
    $eventsManager->attach('dispatch:beforeException', new NotFoundPlugin);

    $dispatcher = new Dispatcher;
    $dispatcher->setEventsManager($eventsManager);

    return $dispatcher;
});
When an event called “beforeDispatch” is triggered the following plugin will be notified:
<?php

/**
 * Check if the user is allowed to access certain action using the SecurityPlugin
 */
$eventsManager->attach('dispatch:beforeDispatch', new SecurityPlugin);
When a “beforeException” is triggered then other plugin is notified:
<?php

/**
 * Handle exceptions and not-found exceptions using NotFoundPlugin
 */
$eventsManager->attach('dispatch:beforeException', new NotFoundPlugin);
SecurityPlugin is a class located at (app/plugins/SecurityPlugin.php). This class implements the method “beforeDispatch”. This is the same name as one of the events produced in the Dispatcher:
<?php

use Phalcon\Acl;
use Phalcon\Events\Event;
use Phalcon\Mvc\User\Plugin;
use Phalcon\Mvc\Dispatcher;

class SecurityPlugin extends Plugin
{

    // ...

    public function beforeDispatch(Event $event, Dispatcher $dispatcher)
    {
        // ...
    }

}
The hook events always receive a first parameter that contains contextual information of the event produced ($event) and a second one that is the object that produced the event itself ($dispatcher). It is not mandatory that plugins extend the class Phalcon\Mvc\User\Plugin, but by doing this they gain easier access to the services available in the application.
Now, we’re verifying the role in the current session, checking if the user has access using the ACL list. If the user does not have access we redirect to the home screen as explained before:
<?php

use Phalcon\Acl;
use Phalcon\Events\Event;
use Phalcon\Mvc\User\Plugin;
use Phalcon\Mvc\Dispatcher;

class Security extends Plugin
{

    // ...

    public function beforeExecuteRoute(Event $event, Dispatcher $dispatcher)
    {

        //Check whether the "auth" variable exists in session to define the active role
        $auth = $this->session->get('auth');
        if (!$auth) {
            $role = 'Guests';
        } else {
            $role = 'Users';
        }

        //Take the active controller/action from the dispatcher
        $controller = $dispatcher->getControllerName();
        $action = $dispatcher->getActionName();

        //Obtain the ACL list
        $acl = $this->getAcl();

        //Check if the Role have access to the controller (resource)
        $allowed = $acl->isAllowed($role, $controller, $action);
        if ($allowed != Acl::ALLOW) {

            //If he doesn't have access forward him to the index controller
            $this->flash->error("You don't have access to this module");
            $dispatcher->forward(
                array(
                    'controller' => 'index',
                    'action'     => 'index'
                )
            );

            //Returning "false" we tell to the dispatcher to stop the current operation
            return false;
        }

    }

}
Providing an ACL list
In the above example we have obtained the ACL using the method $this->_getAcl(). This method is also implemented in the Plugin. Now we are going to explain step-by-step how we built the access control list (ACL):
<?php

use Phalcon\Acl;
use Phalcon\Acl\Role;
use Phalcon\Acl\Adapter\Memory as AclList;

// Create the ACL
$acl = new AclList();

// The default action is DENY access
$acl->setDefaultAction(Acl::DENY);

// Register two roles, Users is registered users
// and guests are users without a defined identity
$roles = array(
    'users'  => new Role('Users'),
    'guests' => new Role('Guests')
);
foreach ($roles as $role) {
    $acl->addRole($role);
}
Now, we define the resources for each area respectively. Controller names are resources and their actions are accesses for the resources:
<?php

use Phalcon\Acl\Resource;

// ...

// Private area resources (backend)
$privateResources = array(
  'companies'    => array('index', 'search', 'new', 'edit', 'save', 'create', 'delete'),
  'products'     => array('index', 'search', 'new', 'edit', 'save', 'create', 'delete'),
  'producttypes' => array('index', 'search', 'new', 'edit', 'save', 'create', 'delete'),
  'invoices'     => array('index', 'profile')
);
foreach ($privateResources as $resource => $actions) {
    $acl->addResource(new Resource($resource), $actions);
}

// Public area resources (frontend)
$publicResources = array(
   'index'      => array('index'),
   'about'      => array('index'),
   'register'   => array('index'),
   'errors'     => array('show404', 'show500'),
   'session'    => array('index', 'register', 'start', 'end'),
   'contact'    => array('index', 'send')
);
foreach ($publicResources as $resource => $actions) {
    $acl->addResource(new Resource($resource), $actions);
}
The ACL now have knowledge of the existing controllers and their related actions. Role “Users” has access to all the resources of both frontend and backend. The role “Guests” only has access to the public area:
<?php

// Grant access to public areas to both users and guests
foreach ($roles as $role) {
    foreach ($publicResources as $resource => $actions) {
        $acl->allow($role->getName(), $resource, '*');
    }
}

// Grant access to private area only to role Users
foreach ($privateResources as $resource => $actions) {
    foreach ($actions as $action) {
        $acl->allow('Users', $resource, $action);
    }
}
Hooray!, the ACL is now complete. In next chapter, we will see how a CRUD is implemented in Phalcon and how you can customize it.